How to Make an IoT Enabled Holiday Tree with Flashing LEDs


With the holiday season well underway, let us kick off the festivities by building an IoT holiday tree with flashing lights! By using the Lasec Education AppMechanic and a few LEDs, you can create this awesome project in which you can control the lights on your papercraft holiday tree.
*This is an original project of AppShed. AppShed has created holiday-themed lessons, each with its own fun holiday-themed app that focuses on App Building, Coding, and Robotics. View all of AppShed's holiday projects here. These are limited-time courses that will be available until January 2023.
WHAT YOU WILL NEED TO BUILD THE PROJECT
We'll use the Pin Control Mode to manually turn on the LEDs, then switch to the Coding Mode to turn the tree lights on and off, and to make them flash.
The following hardware is required:
- An AppMechanic
- 4x LEDs (provided in the AppMechanic Kit)
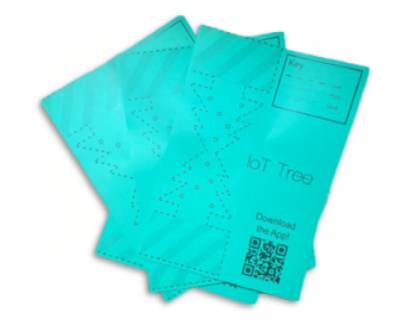
- 1x PaperCraft Sheet (DOWNLOAD HERE)
- 1x Scissors
- 1x Glue Stick
STEP 1: Making your papercraft Holiday Tree
The first step is to download and print the papercraft tree, which can be found HERE. When printing the page, ensure that it is printed border to border or in "fitted to page" mode. If you don't have a printer, just draw the design on a piece of paper and cut it out!
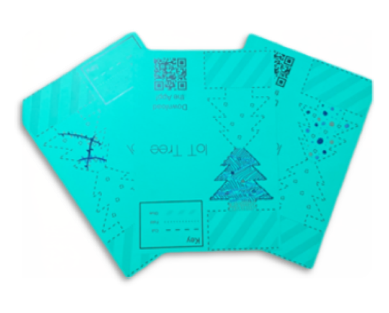
Time to decorate! Before you begin cutting your tree out, take a moment to draw some cool designs on it so that it looks nicer once assembled! You could decorate your tree in any way you want. Bring out your inner holiday spirit!
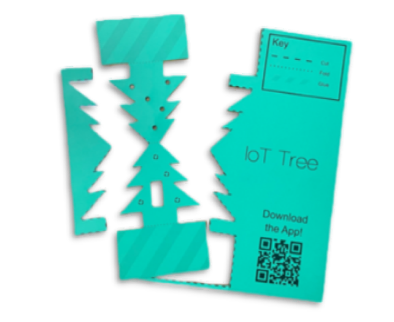
 It's time to put your tree together; the first step is to cut out the dashed lines on the page. Once your tree is cut out, make creases by folding on the dotted lines, and then glue the two striped, grey areas together to complete your tree!
STEP 2: Connecting the LEDs to your IoT board
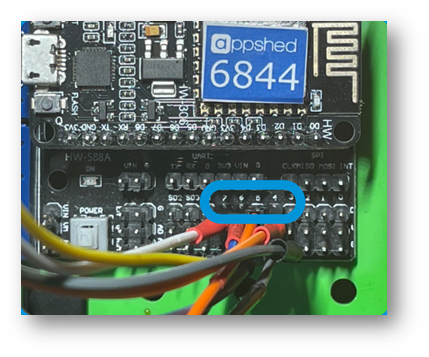
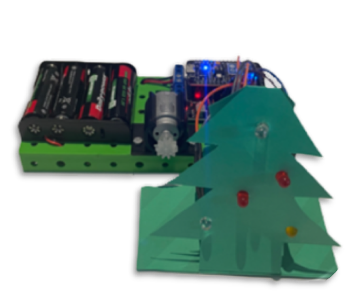
You can now connect your LEDs to the AppShed IoT board; keep in mind that LEDs are polar! So, make sure you know which side of your LED is the positive and which is the negative. On the AppMechanic kit the positive side is Red and negative is Black.
- Connect the positive leg of the first LED to Pin 4
- Connect the negative leg of the first LED to Ground
- Connect the positive leg of the second LED to Pin 5
- Connect the negative leg of the second LED to Ground
- Connect the positive leg of the third LED to Pin 6
- Connect the negative leg of the third LED to Ground
- Connect the positive leg of the fourth LED to Pin 7
- Connect the negative leg of the fourth LED to Ground
STEP 3: Add your LEDs to your papercraft tree
There are four holes on the tree cutout; you must now insert each LED into one of these holes.
STEP 4: Light up your holiday tree!
Pairing your device with the AppMechanic App is the first step in lighting up your tree. Once the app is fully loaded onto your phone, turn on your AppShed IoT board by either plugging in the USB cable or powering it with batteries so that you can pair to it.
- On your phone go to WIFI settings
- Find the AppShed wifi
- Input the password appshedrocks
- Navigate back to the app
You should notice the cog at the top of the screen turns green, this means the device is connected successfully!
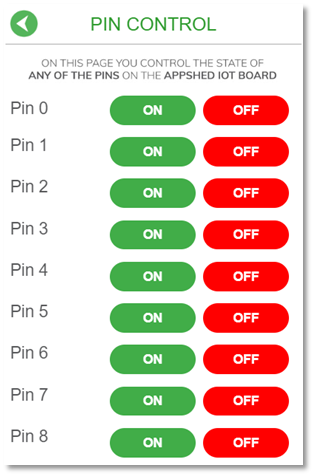
ACTIVITY 1: Experiment with the pin mode to turn the individual LEDs on and off.
After successfully connecting your device to the AppShed IoT Board and loading the AppMechanic App, press Get Started to navigate to the homepage and select Pin Control. To turn the LEDs on and off, play with pin mode. Remember that your LED’s are connected on Pins 4, 5, 6 and 7.
ACTIVITY 2: Switch all of the LEDs on and off.
Navigate back to the homepage of the AppMechanic App and select Coding. Copy and paste or retype the following into the LOGO CODE box found in Coding:
LOOP (
D4 1
D5 1
D6 1
D7 1 WAIT 500
D4 0
D5 0
D6 0
D7 0 WAIT 500)
Your code will look something like this:

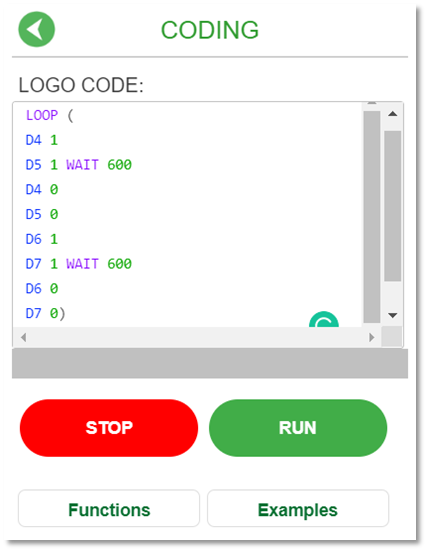
ACTIVITY 3: Make the LED’s Sparkle
Navigate back to the homepage of the AppMechanic App and select Coding. Copy and paste or retype the following into the LOGO CODE box found in Coding:
LOOP (
D4 1
D5 1 WAIT 600
D4 0
D5 0
D6 1
D7 1 WAIT 600
D6 0
D7 0
)
Your code will look something like this:
ACTIVITY 4: Building an App through Appshed App Builder to control your AppMechanic Christmas Tree
Click HERE to learn how to create another app that controls the LEDs on your papercraft tree! AppShed's App Builder is used to create a nice-looking app that includes a tiny bit of JavaScript to make it all work!
Now it is your turn! Create your own IoT Holiday Tree and share it with us!
Let us know in the comments if you have tried this?! If you have purchased an AppMechanic, don't forget to submit your project ideas to us. We are looking to share talented users' work with other users through our website.
To submit your project on the App do the following:
- Navigate to the home screen of the App
- Click on projects
- Scroll down to user-made project
- Click on submit your project
We will be watching this space and rewarding great ideas!
![]()
![]()
Contact our Sales Solutions Specialists at educationsales@lasec.com to find out more about our product offerings.
►Check out our Social Media Pages to not miss out on any updates:
Subscribe to our YouTube Channel
Find us on Instagram
Find us on Facebook
Find us on Twitter
December 19, 2022
| Tags: Educational Kits, Lasec Education, STEM, 4IR, app, robotics, AppMechanic, coding
Related Posts

Rethinking Education - Discover the possibilities of Teaching for the 4th Industrial Revolution
Posted on July 30, 2020
The Best Way to Introduce 4IR into your Classroom
Posted on August 18, 2020

Create a Portable Fire Alarm Using the Lasec Education AppMechanic
Posted on August 27, 2021

How to Create and Decipher Morse Code, Even if you’ve Never Tried it Before!
Posted on October 25, 2021
Key Parts of a Compound Microscope and How They Function
December 15, 2016

4 Fun Science Activities to try with a Slinky Spring
October 24, 2016

Making Suet Balls for Birds
March 31, 2020

Resistors in Series and Parallel
May 12, 2020

Mobile Science Lab
June 11, 2018

How to set up the Boyle's Law Apparatus
May 21, 2018


How to Make an IoT Enabled Holiday Tree with Flashing LEDs
December 19, 2022

Introducing Lasec Education
December 1, 2022


Why We Love our Grade RR-R Educational Kit (and You Should Too!)
September 14, 2021


Comments